Overview
In general, rendering in Houdini requires a camera defining the viewpoint to render from,lights to illuminate the scene, and a render node representing the renderer and render settings to use.
(Some render preview techniques allow you to render without the camera, lights, or a render node. In some cases Houdini will simply use the current view, a headlight, and default render settings to do preview renders.)
By default, Houdini uses the mantra rendering program to convert Houdini scenes into images. You can use other renderers such as RenderMan and AIR by using a the render node for the alternate renderer (and switching to shaders compatible with that renderer) instead of using the default mantra render node.
Mantra has several different rendering engines, which use different algorithms to render the scene. You should use the physically based rendering engine unless you have a good reason to use another engine. See understanding mantra rendering for information on the different render engines.
See physically based rendering for information on using physically based rendering and controlling noise in the image.
See render quality for a list of the most important render properties to control render speed and quality.
See rendering as part of a workflow for information on automating and distributing large scale renders.
See tips and tricks for various advice about rendering.
Interactive render previews
The Render view, sometimes called the IPR (interactive photorealistic render) view, shows a rendered image that updates as you move lights and objects, change parameters, and so on.
The Render region tool lets you outline a rectangle in the 3D viewer that acts like a mini render view. It renders that part of the view and updates the rendered rectangle as you change things.
Setting up a render node
Add lights to the scene and create a camera. See lights and cameras. If you don’t have lights in the scene the render will come out black.
| To… | Do this |
| Create a render node | In the main menus, choose Render > Create Render Node > Mantra. Mantra is Houdini’s powerful built-in renderer. If you only have one camera in the scene, it is automatically chosen as the camera the new render node will render from. |
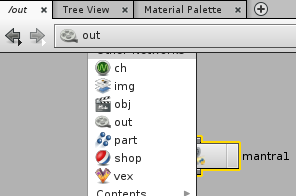
| Edit the parameters of a render node | You can edit a render node’s parameters and render properties in theparameter editor. Choose Render > Edit Render Node > node name to open a floating parameter editor for the render node. or In the network editor, go to the “Outputs” (/out) network. (Click the first segment of the path at the top of the network editor pane and choose out.) Select the node to open it in the parameter editor pane. |
| Set whether to render a single frame or animation | The Valid Frame Range menu controls whether this render node renders single frames or sequences (animations). Choose Any frame to render single frames. Choose Frame range to render a sequence. If you are rendering a sequence, make sure to include the frame number variable $F in the filename, otherwise the renderer will overwrite ever frame with the same name. See expressions in filenames. |
| Set the output size/resolution | The size of the rendered image is controlled by a parameter on the camera. Select the camera object and set the View > Resolution parameter in the parameter editor. (For help on the other camera parameters, see theCamera node help.) or You can override the camera’s image size parameters in the render node by turning on Properties > Output > Override camera resolution. |
| Set the camera to render from | Click the Main tab and edit the Camera field. (Click the button to the right of the field to choose the camera from a list.)
|
Important mantra render properties
| To… | Do this |
| Set the output filename | Properties > Output > Output picture. A value of ip will render directly into the MPlay image viewer. Any other value is taken to be a filename. |
| Set the output file format | By default, mantra will infer the output image format from the file extension. If you’re using a non-standard file extension, you can set Properties > Output > Output device explicitly. You should render frames to pic or exr format, and textures to rat format. For old peripherals you may need to render to tiff format. To output to Shake, you may need to use cineon. Cineon uses a logarithmic color space, so if you’re using the recommended linear color space in Houdini, you’ll need to convert color spaces (for example, using log-to-lin and lin-to-log compositing nodes) on load/save. |
| Set the rendering engine | Properties > Render > Rendering engine. See understanding mantra for more information. |
For help on the other render parameters, see the Mantra node help.
Starting a render
The ![]() Launch render button in the toolbox on the left side of the viewer lets you launch a render.
Launch render button in the toolbox on the left side of the viewer lets you launch a render.
![]() the
the ![]() button and choose a render output node to render, or View: Mantra to render the current view.
button and choose a render output node to render, or View: Mantra to render the current view.
![]() the
the ![]() button to use the same render output as the last render (the default is a “view render”).
button to use the same render output as the last render (the default is a “view render”).
You can also launch a render by choosing Render > Start Renderer > render node in the main menus.
If you have a render output node open in a parameter editor, its parameter interface includes a Render button to start rendering the node.
You can use the render HScript command or the hou.RopNode interface in Python to start a render.
Controlling object visibility
| To… | Do this |
| Make an object visible or invisible in the viewer | Turn the object’s Display flag on or off.
|
| Make an object totally invisible in the render | In the object’s parameter editor, click the Render tab and turn offRenderable. |
| Make an object invisible but cast reflections/shadows | In the object’s parameter editor, click the Render tab and turnRenderable off and Phantom on. |
| Use different geometry for viewport display and rendering | In the geometry network of an object, you can set the display and render flags on different nodes to indicate different geometry output for display and rendering. This is useful to replace low-resolution proxy geometry for display with high-resolution geometry for rendering. |
| Instance geometry onto points at render time | See point instancing. |
| Prevent an object from reflecting | Edit the Render > Shading > Reflection Mask parameter on the reflective object. |
Tips
You can render a deep camera map to get a “2.5-D” image with depth information. (When rendering .pic or .rat, the depth information is embedded in the file. When rendering.exr it is saved to an additional output file.) The depth information lets you composite rendered images in 3D.
The Switcher object is a special camera that lets you animate switching between the viewpoints of several different cameras.
Click the Render Control button on the parameter editor of the render node to open theRender Control window. This window lets you temporarily override render parameters (such as the frame range, or whether to render dependencies) per-render, without having to edit the parameters on the node (and remember to change them back).
In the main menu, choose Render > Edit Render Node > render node.
Click the Render Control button on the parameter editor of the render node.
Set the Frame Range option in the Output Overrides section.
You can also override the rendering of dependencies from the window. See how to set up a render node and the Render Control window for more information.


