
Mocha擦除物体的流程
对象删除只需要几个简单的步骤就能很好的工作了。良好的去除的关键是跟踪背景和正确的前景。
1. 确定你的前景和背景的平面
首先来回滑动时间线,我们来判断画面的深度,寻找前景,背景所在的平面,以及判断摄像机运动的方式。
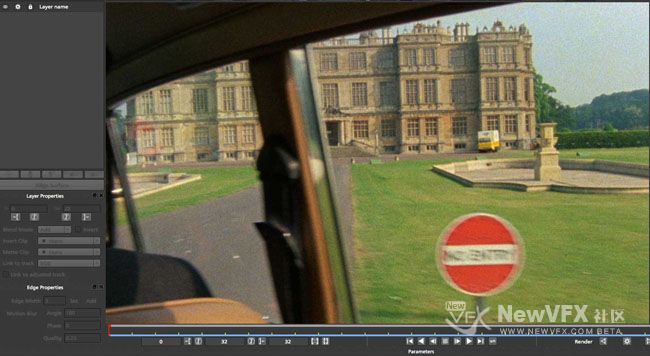
例如,在下面的照片,符号在前面的地上,车门又在标志符号的前面,(而且是透明的)
2. 跟踪和Roto出你的前景元素
我们需要将前景从背景中绘制出来,你并不用担心追踪前景的难度,如果前景无法追踪也没有多大关系,你可以使用关键帧大致绘制出前景即可,如果前景比较明显我们就使用自动追踪来处理。我们是使用背景当中的画面来替换前景中的物体。我们要区分出来,使用哪部分背景替换前景。
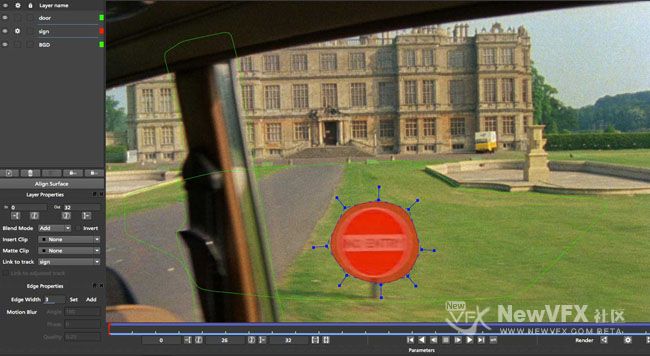
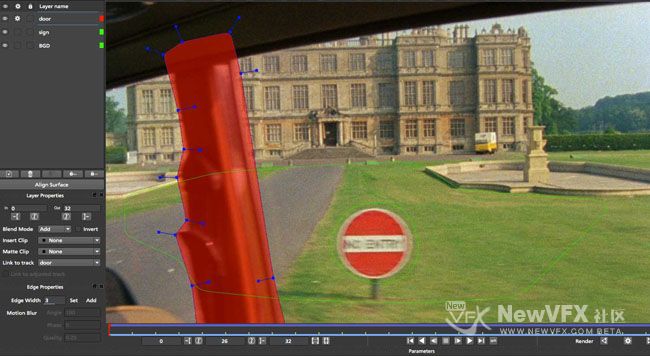
在下面的例子中,我们已经roto并追踪号了 橘红色的标志,还有车门。
3. 确保你的层的顺序是正确的
Mocha层的顺序。靠近相机越近的物体应该在更高的层上,背景应该在底层,前景对象应该是在层列表的顶部。
在这个例子中:车门的层应该在橘色标志的上面。
4. 跟踪你的背景平面
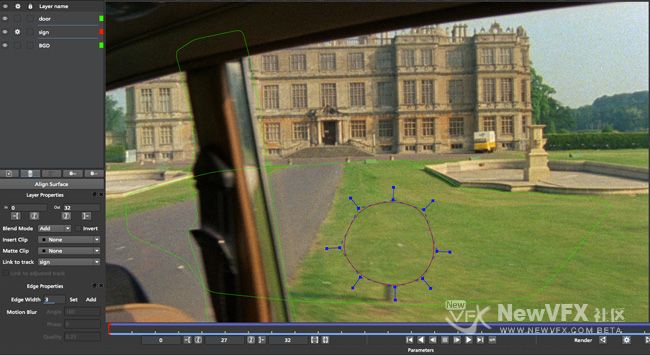
当我们把前景绘制出来并在时间线上做好关键帧后,我们需要绘制一个更大的形状(这个形状要大于前景的大小),确保背景层包住了前景层然后进行追踪。很多时候我们需要绘制多个背景层,比如地板和墙面,我们需要绘制两个独立的平面并分别追踪它们的运动。
下面我们可以看到,我们的背景是使用一个层来绘制的,并放置在了层的最底部,覆盖了最大范围的草地,
5. 选择你想要替换的层和调整你的删除参数
切换到删除选项卡并调整参数(参见下面的删除参数)。关键事情要专注于你的搜索范围,是否您需要手工创建或调整cleanplate,还有是否需要使用一个光照模型。
We recommend trying a remove with Illumination modeling set to None first. This is the fastest setting for removals, and can quite often be all you need if there is not much light difference in the background over time.
我们建议尝试删除与照明建模首先设置为None。这样替换的速度会非常的快,经常用在没有光线变化的背景。
6. 渲染
当你的层设置和搜索区域都设置正确后,点击向前或者向后渲染,擦除工作就开始了。
| 删除可能是一个缓慢的过程取决于镜头的分辨率和帧的数量要删除。您可以优化您的搜索范围(见下面的删除参数),但请记住,删除质量不同。 |
必须定义一个或多个背景层,使前景物体包括在背景中。这是拍摄时要注意的。
想要得到你期望的结果你应该遵守以下规则:
- As the tracker computes the motion of planar objects in the scene, you get the best results if the background is planar, or it has been subdivided into planar elements. Otherwise you might see artifacts.
- If mocha Pro cannot track the background accurately you will probably get artifacts. If your selection of the background includes objects that move differently to the background this can reduce the accuracy of the computed motion.
- If your selection of the background includes parts of the foreground objects then this can cause problems for the tracker as it will compute a motion for the background that is influence by the movement of the foreground. This may also cause artifacts when the removal is performed.
- If the background contains e.g. a waterfall or another object that changes appearance from frame to frame, you will most likely get artifacts if you try to remove a foreground object that moves across such a background. mocha Pro will not know how to handle the changes. Another cause of such artifacts is moving specular reflections.
Remove Parameters
Here we provide a breakdown of each remove tool parameter and how to use it effectively.
When changing parameters in mocha Pro the change only affects the currently selected layer. To change the parameters of a layer other than the currently selected layer that layer must first be selected.
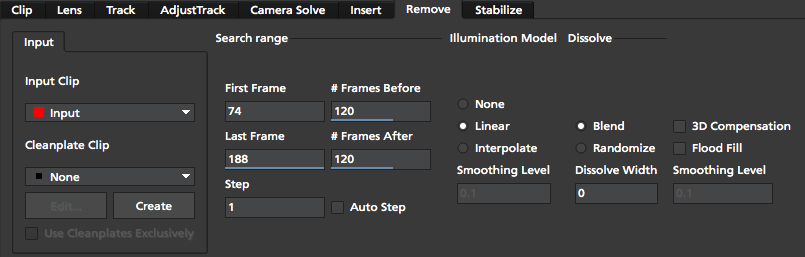
Input Tab
Here you specify the input clip for the remove process and any cleanplates you wish to import.
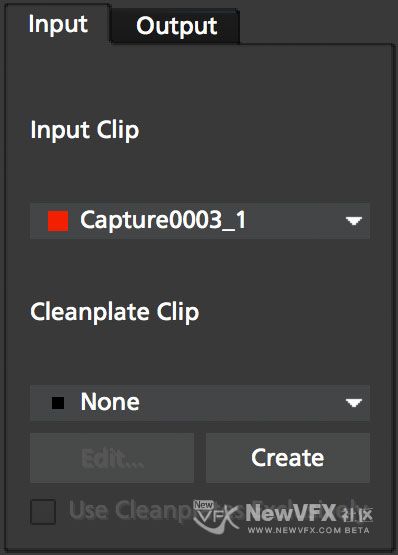
Input Clip
You can choose from any of the mocha Pro result clips to be used as the source clip to fill the requested foreground layers, instead of the default, which is to use the originally imported clip as the input clip. This can be useful if you have to do multiple passes to get an effective remove.
Cleanplates
Here you can import cleanplates to replace frames in your footage. If you don’t have enough background to use in your shot, importing your own cleaned up version of a frame can assist the remove tool greatly.
To import one or more cleanplates:
- Click on Import. This pops up the Cleanplates window.
- Click on the file Import… button to specify the file(s) you want to use. If they are numbered in the same way as the input clip, they will be given corresponding frame numbers. Otherwise, edit the Frame Number field for each cleanplate to set up the correct frame number. The entries for two cleanplates will look like this:

- By default the Preview option is switched on. This means that the selected (highlighted) cleanplate will be shown in the display window. The current frame viewed on the timeline is also changed to the selected cleanplate frame. When Preview is switched off, the view switches back to the clip you are viewing.
- Click on the File name or Frame Number for any cleanplate to change the selection. The Preview option allows you to select the correct frame number for your cleanplate(s). If you import a single cleanplate, the frame number will be listed as “All”. This means that the cleanplate will be used for all the frames of the clip. Use this option if the camera is locked off. Change “All” to a particular frame if want to change this behavior and track the cleanplate from the specified frame into the other frames.
| The All option only applies when you are using a single cleanplate. |
If you import two or more cleanplates, mocha Pro will try to guess the frame numbers from any numbering in the file name. When using the cleanplates between those frame numbers, mocha Pro will blend the nearest two cleanplates to produce a smooth transition through the clip.
If you want to change the cleanplate settings after exiting the cleanplate window, click on Edit… You would need to do this if you are using the frames on a new machine where the cleanplates are stored in a different location, or just to add new cleanplates. If you re-import files with the same name but different directory to existing cleanplate files, mocha Pro will update the file to the new directory.
Create (Cleanplate)
One useful option within mocha Pro is to create a cleanplate from the currently viewed frame.
To do this, make sure you are viewing the frame you want to use and click on the Create button. This will create a clip containing the frame you are viewing, and set the Cleanplates clip to the new clip. You can then touch up this cleanplate from your Results folder.
When you save your edits, it will automatically be updated in mocha Pro to be used in the cleanplate list.
Use Cleanplates Exclusively
If this option is checked, only the cleanplates will be used by Remove to remove the pixels in the selected layer. If it is unchecked, the normal Remove process will be used, pulling in pixels from other frames in the input clip. The cleanplates will then only be used to remove the remaining pixels.
Output Tab
This assigns an output clip for the removal render. You can create new output clips if needed here.
Search Range
Used to specify which frames should be used when removing a layer. The First Frame, Last Frame, # Frames Before and# Frames After settings can be keyframed.
- First Frame and Last Frame specify an absolute range in the input clip
- # Frames Before and # Frames After settings specify the range relative to the currently rendered frame. If both options are used the intersection of the two frame ranges is used.
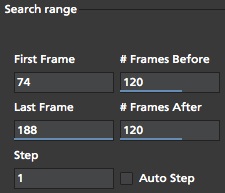
Step
With this option you can specify that not every frame in the reference range is to be used.
Setting it to three, for instance, means that only every third frame will be accessed.
This feature can speed up the removal process for large projects, especially film projects, which are very memory intensive.
| Setting a step value can skip over clean plates for specific frames causing them to not be used in the Remove calculation. |
Auto Step
This is an automatically calculated version of the manual Step field. If you’re not quite sure what step is optimal,
Auto Step will look at the motion of the layers and try to determine the best step to use.
Illumination Model
This specifies how to model changes in illumination.
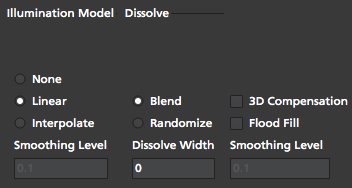
- The None option will not model changes, giving you a result very quickly.
- Linear will model global changes and should hence be used if the brightness change between frames are caused by e.g. changes in aperture.
- Interpolated will model global and local changes and is often useful when a cleanplate is used.
Smoothing Level
This controls the amount of smoothing applied in the Interpolated model. Increase the value if there are artifacts which might be resolved with more smoothing, either spatial variations or temporal variations.
Dissolve Width
Select either Blend or Randomize and increase the width value to reduce artifacts which sometimes can be seen when illumination modeling fails. This option causes pixels from different frames to be dissolved into each other to avoid tearing artifacts. Blend uses alpha blending from the replaced areas to either the original pixels or the recently replaced areas. Randomize mixes original and replaced pixels in a random way to achieve a similar effect.
3D Compensation
3D compensation can be switched on to try to remove artifacts due to the background layer not being planar. For example, if you have tracked a background that has subtle parallax it can cause removal in other frames to look incorrect. 3D compensation attempts to model the parallax change in the target removal frame.
Flood Fill
If part of the missing background has not been found anywhere in the clip, and the foreground object therefore cannot be completely removed, Flood Fill can be switched on to fill the remaining region using a flood fill method. This is especially useful when it is the matte you are interested in, as you then don’t care too much about the quality of the removal but require that the foreground object is completely removed to avoid holes in the matte. The Smoothing Level should be increased if you result is not as smooth as it should be or there are temporal variations in the results.
Stereo Remove
Stereo Remove works in exactly the same way as Mono Remove above, with the additional bonus of being able to render both views at the same time and also choosing whether or not each view assists the other view during the remove process.
- Track the background in both views with a layer as outlined in “Stereo Tracking” above
- Mask out and animate the foreground object you want to remove. You will need to check to make sure the object is correctly covered by the layer in both views.
- Make sure the foreground layer is above the background layer in the layer controls.
- Adjust your remove parameters (See the full User Guide for details on Remove parameters)
- If it is not already on, press the “Operate in all views” button on the right side of the render buttons.

- Click the render button
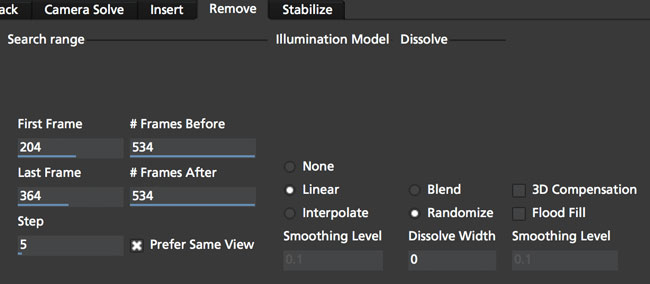
By default “Prefer Same View” is checked on in the search range section of the Remove tab. This will attempt to use the current view rather than both views to perform the remove.
If you have useful information in the other view that may assist the remove, you can uncheck this option.
Tips for Removal
Some of the object is still visible after removal.
- Remember that you can only remove an object if the background behind it is also tracked. Track the background layer(s) before removing a foreground object.
- Check that the object is inside the selection contour in every frame. If it isn’t, move the control points outwards as necessary to completely enclose the object. Use linking forwards/backwards to apply changes to the contour in multiple frames.
- Check whether the relative motion of the foreground and background layers is sufficient to see “behind” the whole of the foreground object. mocha Pro only needs to see the background in one frame to achieve good results. If more images are available in the clip, track the selections over a few more images. This may provide mocha Pro with the extra information it needs.
- Try pulling the selection contour closer to the edge of the object. This will provide mocha Pro with extra background pixels.
The replaced background region is brighter/darker than the surrounding image.
- Changes in illumination or camera aperture will change the overall brightness of the image, making direct replacement of pixels inappropriate. Select the Linear illumination model to compensate for the brightness changes and repeat the object removal.
- If the variation is more complex than a simple brightness change, try the Interpolated illumination model, which will compute and compensate for changes in apparent brightness and color that vary across the region being removed.
The background patches don’t line up with the surrounding image.
- This may be due to inaccurate tracking of the background. If you think this is possible, see the above hints on improving the tracking.
- If the tracking accuracy cannot be improved, increase the Dissolve Width. This will dissolve the patches into the original image and reduce the tearing artifacts.
- For small foreground objects such as wires, in front of a non-planar background, switch on 3D Compensation. This will attempt to model the effect of the varying 3D depth of the background.
- If there is more than one background selection behind the foreground selection, special treatment of the boundary between them is often required. If the background layers are joined, such as a wall and floor selection, use the Attach Layers tool to join them together and avoid artifacts at the boundary. If they are moving independently, you need to adjust the boundary in the front background selection to accurately delineate the boundary between the two background selections.
Remove is slow.
If you have a long clip, especially working with HD or film, Remove can be slow because it has to search over a large number of images with a large memory footprint.
Remove is the most memory intensive module in mocha Pro, and it will always benefit the performance to add more memory. If mocha Pro can fit all the images it needs in memory, performance will be dramatically accelerated when rendering Remove in multiple frames, because it will minimize the amount of disk accesses.
Your aim should be where possible to change the settings to achieve this. Within mocha Pro there these options:
- Change the First Frame and Last Frame in Range to a smaller range of frames. Sometimes mocha Pro can spend a lot of time removing a small part of the foreground image, and if your layers were chosen loosely, not all of the foreground needs to be removed. Experiment by reducing the range of frames searched.
- Increase the Step in Range to sample less frames.
